Pages

Showing posts with label Creative Everyday 11. Show all posts

Friday, February 03, 2012

{ What I MAde # 23 - Two Face Zipper Pouch }

 What I MAde #23 - Two Face Zipper Pouch. 
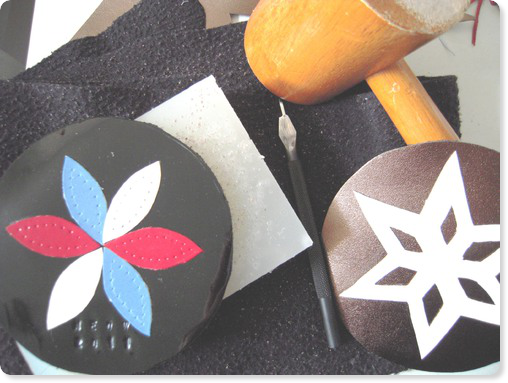
I call this "two face" coz I used different leather pieces and designs for the front and back. (Well honestly I was trying to use up some of my leather scrap...) I made this before Christmas 2011, but forgot to post about it. I use it mainly as a small pouch for my rings, bracelet and other things to keep in my bag.  I didn't write a tutorial for it since it is quite simple and easy to make. If you have any questions, feel free to leave me a comment below. Take Care :)

Thursday, December 22, 2011

{ What I MAde # 22 - Star Pouch }

 What I MAde # 22 - Star Pouch. 
  1. Determine the design you would like, draw and cut out a shape for the leather pouch.
  2. Trace the shape and cut out the leather. I use leather scrap, around 0.5mm thick, from my previous leather craft class.
  3. Punch holes for snap button and other design onto individual leather pieces first. Then stick the front and back together and punch holes with leather craft tools. Sew pieces together.
  4. Add ribbon as a decoration. 
I use this as a decoration and I put a bunch of Christmas tradition print outs into it as well.

Saturday, December 17, 2011

{ What I MAde #21 - Ribbon Wreath }

 What I MAde # 21 - Ribbon Wreath 
  1. Draw circles of sizes you want on thick cardboard
  2. Cut out and use double sided tape to add the ribbon onto the cardboard.
  3. Continue to wrap ribbon around the circle and remember to add a loop at the top.
  4. Decorate the wreath with stickers or anything you like. I think this ribbon wreath idea can also be used a decorative frame for photos.
I have been reading a lot about DIY Christmas decorations lately and finally decided to make something myself for a greener holiday. So I found most of the materials I have at home and only buy 4 items from store. Here is a list of Christmas related craft I'm working on.     
  1. Snowflake - made of thick magazine page I have from home. (done!)
  2. Ribbon wreath - made of ribbon, fabric, cardboard, and stickers. (done!)
  3. Star pouch - made of leather scrap and can be used as a pouch and decoration. I'm almost done with the pouch, still need to print out a list of "Christmas traditions" to be put inside. (done!)
  4. Christmas journal. 
  5. Ipad pouch for Mr. C - Mr. C's Christmas gift. 
Inspiration from: gala darling, and paper bag wreath by Giddy Giddy.

Monday, December 12, 2011

{ What I MAde # 20 - Christmas Journal }

What I MAde # 20 - Christmas Journal & Envelope. 
  1. The Journal Part: I use the hard covers and paper from a Muji sketchbook.
  2. Cut wrapping paper into the right size and leave around 1-2cm margin on each side. Cut the four corners as well.
  3. Glue the paper on the front and fold the four sides onto the back of the cardboard. Cut another piece of paper to cover the back side.   
  4. Decorate the front with labels, pictures, or masking tape. I got this beautiful roll of MT for a long time and finally decided to use it. (It has pictures of wax seals on it!!! :D)
  5. Do the same for the back cover of the journal. Punch holes on the cardboard since I will put the whole journal inside my leather binder. 
  6. The Envelope: Cut open an envelope as a template. Moderate the size to fit the journal. 
  7. Cut, fold and glue the paper to form an envelope. Make sure to use thick craft paper so it would not bend easily.
  8. Decorate it anyway you like!
I'm going to use this as a Christmas journal and a sketchbook. The envelope will be used to collect all the beautiful shop leaflet, other bits and pieces during Christmas. Now I have to go sketch up some Christmas decoration ideas. 

Wednesday, December 07, 2011

{ Let's Build a Rainbow - Black & White }

Let's Build a Rainbow - Black & White
  • Sorry, I was really rushing when I did this. I wanna to complete the challenge so this is just a simple drawing of a book that I've been reading for a while. It is a book about design and finding deign inspirations from everyday life.
  • I love this 5-day color challenge because it pushed me to use colors that I don't usually use. And push me to meet deadline for my drawing brain. I hope there will be more interesting challenges in the future. Now I really need to get some Christmas decorations for my apartment. I'm thinking of handmade decoration but will see if I have time for it. Take care everyone! :) 

{ Let's Build a Rainbow - Purple }

Let's Build a Rainbow - Purple
  • Purple is my fav color! I think I could do a series of drawings in different shades of purple. This is a drawing of my "cash bag" since I put my wallet, coin bag and keys in this little thing. The real thing is a lot more colorful... I like to organize my bag (the black-hole) with smaller bags since it is so much easier to find things. I would do a drawing or a photo of what's in my bag later on since I love love watching what's in other people's bags.

{ Let's Build a Rainbow - Aqua }

Let's Build a Rainbow - Aqua
  • I love love this color and I love stationary even more! I did this drawing for my 2012 kitty schedule book and my dream book. I will share more photos of my dream book later on. 

{ Let's Build a Rainbow - Yellow }

Let's Build a Rainbow - Yellow.
  • Honestly Yellow &  Orange are my least fav colors. I seldom use them in my art works, but I think this is a good challenge to get out of my comfort zone.

Monday, December 05, 2011

{ Let's Build a Rainbow - Pink }

Let's Build A Rainbow - Pink
I did a drawing of the steam bread I made. I don't know that using only one color would  turn out to be more difficult than I thought! Though I love how this turns out! Come join us and post your pages on or before Dec 7.

Saturday, December 03, 2011

{ Let's Build a Rainbow - Red }

Let's Build a Rainbow - Red
It is a 5-day color challenge. Create art in one color each day this week. This is my piece in Red. I always associate red with Christmas and am so in love with elephants lately so I made this sketch for the color red.
Enjoy :D
And I made this using the Muji red ink pen. 

Thursday, December 01, 2011

{ Vision Journal Dec 1, 11' }

Sill working on my vision journal, cut up lots of magazine pages for it.
Will post more photos later.:D

Thursday, November 24, 2011

{ What I MAde #19 - Leather Bookmark Nov 24, 11' }

What I MAde #19
Inspired by Cliprite.

What you need: a piece of scrap leather (mine is about 19cm x 2.5cm and 1mm thick), ruler, cutter, needles, nylon thread, some sort of punching tool. (I use a set of leather craft punching tools, but they can be easily replaced with other house hold items.)
Decide the words and font you would like to use before cutting the leather strip. You may need a larger or smaller piece. Leather strip can be replaced with fake leather as long as it is sturdy but not too thick.
  1. Punch holds along the side of the leather strip.
  2. Sew.
  3. Decide which side is the front side of the bookmark.
  4. Punch holes on the front side. Depending on the size of the strip. The distance between the punch holes is 4mm for mine.
  5. Sew in the letters.
  6. Cut a slot at the back, put a paper clip in.
  7. Sew at least 4 holes at the middle of the bookmark to hold it together.
  8. Done!
:D Sew in any letters you like and this will make a great gift for book lovers in your life.

Wednesday, November 16, 2011

{ Life Goal #1 - Nov 16, 11' }

I created a collage with some of the digi elements provided by Helga of the ARTchix Studio. Then wrote up some of the life goals that I would like to achieve on it. The collage now sits on the wall facing my desk at home and I made a copy for my planner as well.

Monday, November 07, 2011

{ What I MAde #18 - Nov 11' }

What I MAde #18
  • I wanted to make something simple before I jump into another leather project. So I took out a piece of eraser and my curving knife to make a blank calendar frame to use in my little Muji notebook. I realized that using eraser may not be the best material since it is so so soft but is ok for practice.

Thursday, November 03, 2011

{ Journal Thursday - Nov 3, 11' }

  • I have not done an art journal page in ages, so it is very excited to get back into this old journal. I have been playing with this journal since I came back to Hong Kong about 5(?) years ago. I still have not finished this one since I have the Wreck This Journal and other moleskine sketchbooks that I'm playing with.  
  • The page on the left (1st photo) is a page done with the free digi freebie from Artchix Studio. I plan to make it into a digi background for my habit tracking list and my part of my vision journal.
  • The page on the right (1st photo) is for Illustration Friday.
  • I have started to work on a vision journal, this is the cover. Will post more photos of this when done.

Monday, October 24, 2011

{ What I MAde # 17 - Oct 24, 11' }


    • This is the second leather bag I made. This one is a smaller shoulder bag since I don't want to hurt my back. This smaller the bag is, the more it makes me think about what I need to bring vs. what I want to bring.
      Approx. Dimension: W 200mm x H 180mm x D 100mm.